

Baby Led Weaning. What it is and how to start; recipes included
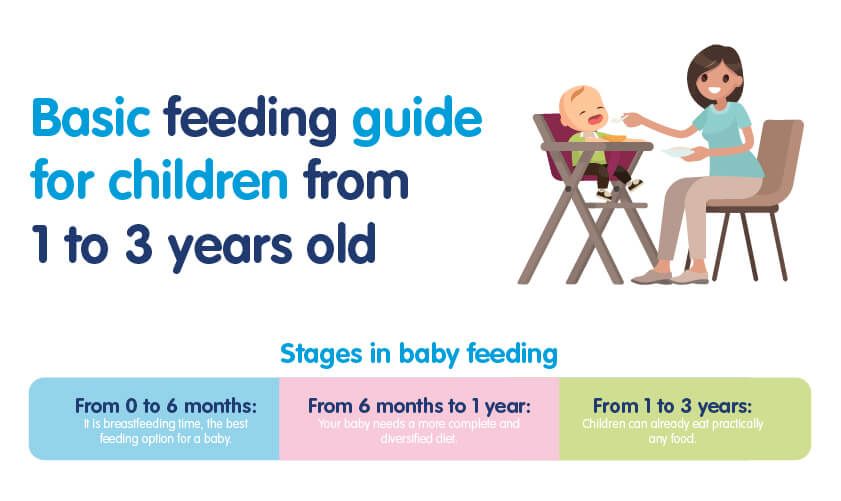
Most parents are concerned about their children’s nutrition. Concern that grows in intensity after 6 months of age, when complementary feeding should begin.
The truth is that there have been many changes in this field over the years, and your pediatrician may even advise you to follow guidelines that are very different from those recommended a few years ago.
That is why we will discuss Baby Led Weaning (BLW) in this article, a type of complementary feeding that can be a great ally at this stage.
In addition, in the final section of the article, you will find some Baby Led Weaning recipes that will assist you if you decide to try this method.
But first, what exactly complementary feeding is?
What complementary feeding is?
Before learning about BLW, it’s important to understand what complementary feeding is.
The Spanish Association of Pediatrics (AEP) defines complementary feeding (CA) as:
«A process in which solid or liquid foods other than breast milk or infant formula are offered to the infant as a supplement and not as a substitute for it.»
It is important to emphasize in this definition that it is, as the name implies, a supplement to the child’s current nutrition and never a replacement.
Milk will be the primary source of nutrition for babies until they are 12 months old (either breast milk or formula). This stage is a transition to a more complex way of eating that will take place one the baby is one year old.
When it comes to complementary feeding, we can choose from different forms or methods, but as we mentioned at the beginning, in this article we will talk about Baby Led Weaning.
What Baby Led Weaning (BLW) is?
Baby Led Weaning (BLW) is a type of complementary feeding based on the baby’s self-regulation of the food he consumes. This means that the child will manage the food that we provide him, while always being supervised by an adult.
This type of complementary diet has a few advantages and disadvantages, which we will discuss below.
BLW advantages:
- Child development. The baby gains independence and motor skills. Furthermore, this type of complementary diet aids in the development of the mouth’s structure and the emergence of teeth.
- Greater interest in food. The different colors, shapes, and flavors draw the child’s attention, which promotes the acceptance of new foods. As a result, as an adult, he will have a healthier diet.
- A greater understanding of his diet. Because he controls how much food he eats, he is more aware of when he is hungry or satiated, avoiding overeating and preventing childhood obesity.
- Family connection. Because we become direct witnesses to our child’s development and evolution at mealtime, this type of diet promotes family time and togetherness. Furthermore, by doing it all at once, meals become a time of family reunion where we all learn.
BLW disadvantages:
- The dirt. Your baby will get so dirty that he will be ready for a shower the first few times, and your entire house will end up full of food. It’s perfectly normal. He still struggles to control the movement of putting food in his mouth and, in most cases, he will start playing with food. This is all part of the process of discovering food… It’s a great learning experience.
- Expecting your baby to be hungry. This is not a disadvantage, but rather a misconception about the BLW. The truth is that, at this stage, and as previously stated, the new food is a supplement and should not be used in place of his primary source of nutrition: milk.
If, after learning what BLW is and the pro’s and cons of this method, you decide to give it a try, keep in mind that just because your baby is 6 months old does not mean he is ready.
Check the following to see if he is ready to try this type of complementary feeding:
- He is able to sit upright and with good posture;
- has the ability to properly swallow;
- is curious about food and wants to try.
If you notice these three signs in your child, he is ready to begin complementary feeding.
And, to keep you from running out of meal ideas, here is a collection of recipes that will come in handy.
Baby Led Weaning recipes from 6 months old
We understand that this type of diet is unusual, and you may be unsure how to prepare the food.
At first, it is best to feed your baby one food at a time. This makes the transition to the new routine easier. Furthermore, we can easily tell whether or not a food is making him feel bad.
However, as he gets older, we can be a little more creative with the meals we prepare, and we’d like to share three recipes that he’ll enjoy with you.
# 1 Zucchini and carrot burger
You will need half a zucchini, a carrot, an egg, non-dairy milk, and breadcrumbs.
First, you will have to grate the half zucchini and the carrot.
Then mix them with the egg and 5 tablespoons of non-dairy milk.
When everything is well mixed, add 120 grams of breadcrumbs. Shape them into a hamburger and bake for 10 to 15 minutes at 200 degrees.
# 2 Pea pancakes
For the second recipe you will need 500 grams of peas, 140 grams of corn flour, oatmeal, or chickpeas, 2 eggs and olive oil.
First, boil the peas. Once soft, mix everything in a robot: peas, eggs and flour.
Work the dough into a pancake shape and cook it in a pan with a little bit of olive oil.
# 3 Banana and coconut cookies
This simple recipe is the perfect snack for your little one. You just have to mash a banana and mix it with grated coconut.
Then make balls and place them on a cookie sheet. Bake them for 15 minutes at 180 degrees and that’s it.
Enjoy it!
Extra tips before starting the Baby Led Weaning
To conclude this article, we’d like to share a few extra tips that will come in handy when implementing the Baby Led Weaning recipes from 6 months that we’ve shared above:
- Begin in a safe environment, such as a family home. As a result, both you and the baby will feel at ease to begin with.
- Patience will be your most valuable ally. This is a long-term learning process for your child, so you must be patient and believe in his ability to self-regulate.
- Provide textures and shapes that are appropriate for his age. Keep in mind that he lacks teeth, so the food must be soft enough for him to break down with his gums.
- Make sure the pieces are large and in the shape of a cane so he can catch them more easily.
- Begin by providing only one food item. This keeps him from being distracted by too much stimulation and makes it easier to adjust to his new routine.
- Begin introducing foods one at a time to check for allergic reactions.
Do you dare to try Baby Led Weaning now that you know what it is and how to get started?
See you in the next article,
Ciconea


 © 2024. CICONEA NUTRICIÓN S.L.
  by bilnea